Hello, Android Lover If you want to root your phone then this article is for you. Today I will show you here how to root Redmi 10 Prime. You can customize the phone by rooting your phone. Here we will use Magisk Manager and SuperSu flash file to root Redmi 10 Prime through twrp recovery. How to Root Redmi 10 Prime.
To root Redmi 10 Prime we need to install TWRP Recovery on our mobile. To root this phone, you will need a flash file from Magisk Manager and SuperSu
Related Post To This Smartphone
- Download Redmi 10 Prime Firmware (Flash file) Android 12
- Common Issue and Problems on Redmi 10 Prime- Tips and Tricks
- Google Camera 8.3 For Redmi 10 Prime [Best Gcam]
- How to Root Redmi 10 Prime Via SuperSu and Magisk Manager
- Best Custom Roms For Redmi 10 Prime [Android 12]
- Download TWRP Recovery 3.5.2 For Redmi 10 Prime
- How to Unlock Bootloader on Redmi 10 Prime Via Mi Unlock
- Download Gcam MOD APK 8.4 For Redmi 10 Prime
Warning:- I won’t tell you any wrong way here. Use this method at your own risk, if your phone is dead due to any reason, I will not be responsible for that.
Advantage of Rooting on Redmi 10 Prime
- Rooting the phone will give you complete control over your phone.
- Rooting allows you to easily uninstall system applications on your phone.
- You can completely customize your phone.
- Rooting allows you to easily install root applications.
- If your phone is rooted you can also change your IMEI number.
Disadvantage of Rooting on Redmi 10 Prime
- First of all, rooting will void your phone warranty.
- OTA updates will stop coming to your phone.
- Rooting will not protect the phone.
- If any mistake happens while rooting the phone then your phone may get bricked.
A few things are needed before Rooting Redmi 10 Prime.
- Need a computer or laptop.
- The phone battery should be charged more than 70%.
- Redmi 10 Prime must have an original USB cable.
- ADB Drivers must be installed on the computer.
- The latest USB Drivers from Xiaomi must be installed on the computer.
- SDK Platform tool file must be downloaded.
- Mi Unlock application should be downloaded to the computer.
- Your Mi Account must be created in Redmi 10 Prime.
- Redmi 10 Prime must have a TWRP Recovery file.
- Magisk Manager and SuperSu Flash File.
How to Root on Redmi 10 Prime

Before rooting Redmi 10 Prime, read and understand this article completely and then apply it to your phone. To root this phone, the bootloader of the phone must be unlocked as well as TWRP recovery must be installed on the phone.
Before starting this process, let me tell that this process is only for Redmi 10 Prime user. If you use this process on any other smartphone then your phone may be bricked.
[Unlock Bootloader on Redmi 10 Prime]
First of all, we have to unlock the bootloader of our Redmi 10 Prime phone.
- You have to update the software by going to your settings, if the update comes, update it and proceed further.
- Now you have enabled the Developer Option on your phone.
[‘Settings‘> ‘About Phone‘> Click on ‘MIUI Version’ 5-6 times. Now your developer option will be enabled.]
- After enabling Developer Options, now you have to enable OEM Unlock and USB Debugging.
[Settings> Additional settings>Enable OEM Unlock and USB Debugging after going to Additional Settings]
- Now the next work will be the computer, first of all, you have to install Xiaomi USB Drivers and ADB Drivers on the computer.
- After Installing the Drivers, Install the Mi Unlock Application on Your Computer.
- Boot your Redmi 10 Prime phone in fastboot mode after the MI application is installed.
[First switch off your phone and press Power button + Volume down button for 8-10 sec after that your phone will boot into Fastboot Mode]
- After this, you have to open the mi unlock app on your computer and log in with your mi account. [Here you have to log in with your phone’s Mi account]


- If your Redmi 10 Prime bootloader is eligible to unlock then your phone will show the device connected to the application.
- If your phone is eligible then click on Unlock, after clicking on Unlock, click on Unlock Anyway.


- After clicking on Unlock, the processing will appear on the screen, this process may take some time. After waiting for some time the bootloader of your Redmi 10 Prime will be unlocked.

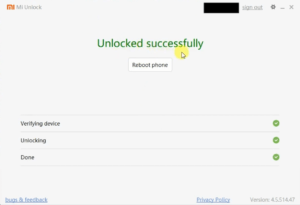
- Now you have to reboot your phone
[Install TWRP Recovery on Redmi 10 Prime]
Now your Redmi 10 Prime bootloader is unlocked next we will go through how to install twrp custom recovery in this mobile.
- Now you have to download and open the SDK Platform Tool on your computer and move the Redmi 10 Prime quick recovery file to the SDK Platform Tool.
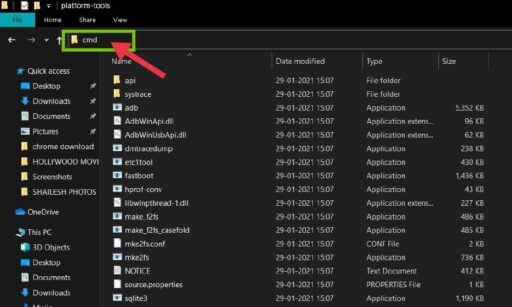
[The moved twrp recovery file has to be renamed with this (twrp.img) name.] - Now you have to open the command prompt in the SDK Platform Tool.
[One has to press the Shift Key + Right Mouse Button in an empty space in the SDK Platform Tool file. This will open the command prompt on your computer]
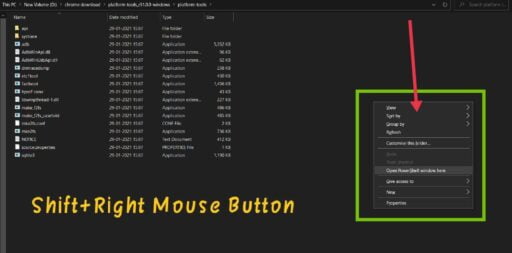
OR
[Or you can open Command Prompt by typing CMD in the address bar of that file.]
- Boot your Redmi 10 Prime phone in fastboot mode.
[First switch off your phone and press Power button + Volume down button for 8-10 sec after that your phone will boot into Fastboot Mode]
- After booting the phone in Fastboot Mode, you have to type the command on your computer in this way. please type the command properly.
Fastboot devices
Fastboot flash recovery twrp.img
Fastboot boot recovery twrp.img
Fastboot reboot

After typing these commands twrp recovery will be successfully installed on your phone.
[Redmi 10 Prime Root Via Magisk Manager]
- After twrp recovery is installed in Redmi 10 Prime
- First of all, you have to download the Magisk manager flash file and move it to the internal storage.
- Now you have to boot your phone in TWRP Recovery Mode.
[First switch off your phone and press Power button + Volume Up button for 8-10 sec after that your phone will boot into TWRP Recovery Mode]
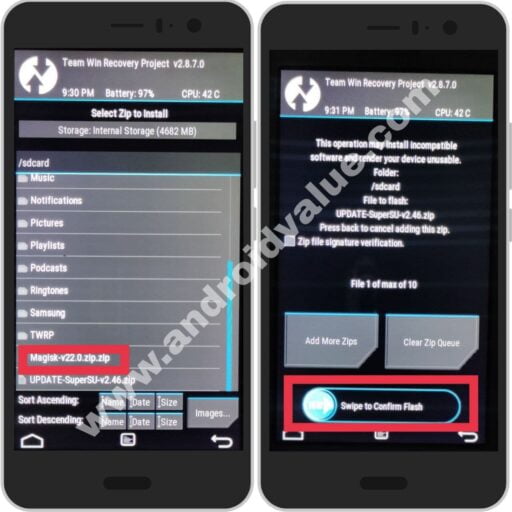
- After booting into recovery mode, you have to click on Wipe Option, next you will see the option of Advanced wipe, clicking on that Dalvik Cache, Cache, System, Data has to be ticked on all four and slide it to Swipe to Wipe.
[Wipe Option→Advanced wipe→Select Dalvik Cache, Cache, System, Data→Swipe to Wipe]

- Click on Install, select Magisk manager flash file, slide it to Swipe To Confirm Flash.
[Install→Select file→Swipe to confirm flash]

- After flashing the file, click on Reboot system. Now your Redmi 10 Prime phone is completely rooted.
[Redmi 10 Prime Root Via SuperSu]
- First of all, you have to download the SuperSu flash file and move it to the internal storage.
- Now you have to boot your phone in TWRP Recovery Mode.
[First switch off your phone and press Power button + Volume Up button for 8-10 sec after that your phone will boot into TWRP Recovery Mode]
- Click on Install, select SuperSu flash file, slide it to Swipe To Confirm Flash.
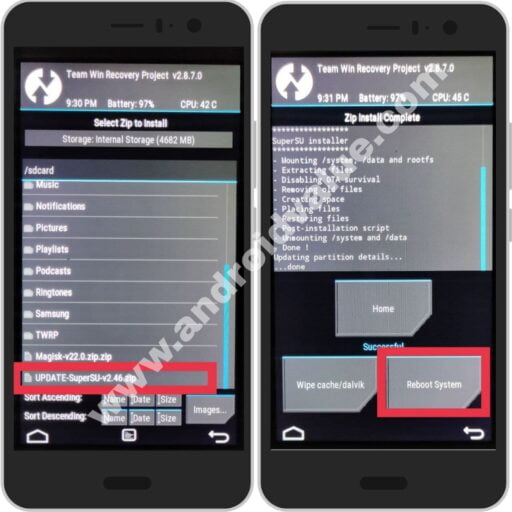
[Install→Select file→Swipe to confirm flash]
- After flashing the file, click on Reboot system. Now your Redmi 10 Prime phone is completely rooted.
[Check Root on Redmi 10 Prime]
- Here we will use an application called Root Checker to check the root of the phone.
- First, you have to download and install this app from the play store.
- After installation, open the app, click on verify and grant permission to the app.

- After granting permission, [Congratulations Root Access is properly installed on this device] message will come.
Thank you for giving your valuable time to this website.
Today I told you how you can root your Redmi 10 Prime.If you have understood this process, then share this article with your friends. thanks