Hello friends, if you are an android lover or android geek then you must have felt like flashing Custom ROM at some point in your mind, or if your phone does not have the latest android update then flash custom ROM for the latest android update in your phone. would have thought of doing. How to Install Custom ROM on Redmi 9 Prime.
Today I will show you how to flash custom ROM in Redmi 9 Prime with the help of this article. In this method, we will need a good custom ROM and at the same time the phone bootloader should be unlocked and TWRP custom recovery should also be installed. In this process, I will also teach you how to unlock the bootloader and install TWRP custom recovery.
Related Post To This Smartphone
- Download Redmi 9 Prime Firmware (Flash file) Android 12
- Common Issue and Problems on Redmi 9 Prime- Tips and Tricks
- Download Google Camera 8.3 For Redmi 9 Prime [Best Gcam]
- Download TWRP Recovery 3.5.2 For Redmi 9 Prime
- Download Gcam MOD APK 8.4 For Redmi 9 Prime
Warning:- I won’t tell you any wrong way here. Use this method at your own risk, if your phone is dead due to any reason, I will not be responsible for that
Advantages of Flashing Custom ROM in Redmi 9 Prime
- The best advantage of flashing a custom ROM on your phone is that you can customize it in your own way.
- Due to Custom ROM, you can run your phone’s latest version of Android.
- You can easily run any Android version on your phone.
- You can also enjoy your phone pixel phone.
Disadvantages of Flashing Custom ROM in Redmi 9 Prime
- Flashing a custom ROM will void your phone’s warranty.
- If a mistake happened while flashing the custom ROM, your phone could be dead or stuck in the boot loop.
- Your phone will stop receiving OTA updates.
- Flashing a custom ROM will destroy your phone’s security. Because custom ROM does not come with any kind of security.
A few things are needed before Installing TWRP Recovery on Redmi 9 Prime.
- Need a computer or laptop.
- The phone battery should be charged more than 70%.
- Redmi 9 Prime must have an original USB cable.
- ADB Drivers must be installed on the computer.
- The latest USB Drivers from Xiaomi must be installed on the computer.
- SDK Platform tool file must be downloaded.
- Mi Unlock application should be downloaded to the computer.
- Your Mi Account must be created in Redmi 9 Prime.
- Redmi 9 Prime must have a TWRP Recovery file.
- Stable Custom ROM For Redmi 9 Prime.
[Download Important File Link]
| SDK Platform Tool | Download |
| ADB & Fastoot Driver | Download |
| Xiaomi USB Driver | Download |
| Mi Unlock App | Download |
| TWRP Recovery | Download |
| Custom Rom | Download |
How to Install Custom ROM on Redmi 9 Prime

Before flashing Redmi 9 Prime custom ROM you have to take care of these phone things. Redmi 9 Prime bootloader must be unlocked as well as TWRP recovery must be installed on this phone. I will show you most of this process by unlocking the bootloader of this phone and installing TWRP recovery in it and then flashing custom ROM.
Before starting this process, read and understand this article completely and then apply it on your mobile. This procedure is only for Redmi 9 Prime users, do not apply this method to any other smartphone otherwise your phone may be dead.
[Unlock Bootloader on Redmi 9 Prime]
First of all, we have to unlock the bootloader of our Redmi 9 Prime phone.
- You have to update the software by going to your settings, if the update comes, update it and proceed further.
- Now you have enabled the Developer Option on your phone.
[‘Settings‘> ‘About Phone‘> Click on ‘MIUI Version’ 5-6 times. Now your developer option will be enabled.]
- After enabling Developer Options, now you have to enable OEM Unlock and USB Debugging.
[Settings> Additional settings>Enable OEM Unlock and USB Debugging after going to Additional Settings]
- Now the next work will be the computer, first of all, you have to install Xiaomi USB Drivers and ADB Drivers on the computer.
- After Installing the Drivers, Install the Mi Unlock Application on Your Computer.
- Boot your Redmi 9 Prime phone in Fastboot mode after the MI application is installed.
[First switch off your phone and press Power button + Volume down button for 8-10 sec after that your phone will boot into Fastboot Mode]
- After this, you have to open the mi unlock app on your computer and log in with your mi account. [Here you have to log in with your phone’s Mi account]
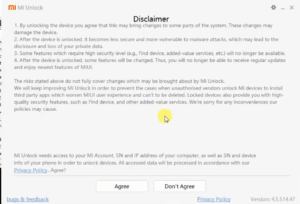

- If your Redmi 9 Prime bootloader is eligible to unlock then your phone will show the device connected to the application.
- If your phone is eligible then click on Unlock, after clicking on Unlock, click on Unlock Anyway.


- After clicking on Unlock, the processing will appear on the screen, this process may take some time. After waiting for some time the bootloader of your Redmi 9 Prime will be unlocked.

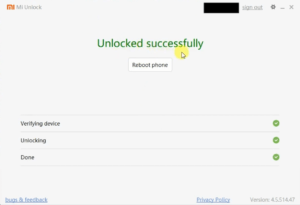
- Now you have to reboot your phone
[Install TWRP Recovery on Redmi 9 Prime]
Now your Redmi 9 Prime bootloader is unlocked next we will go through how to install TWRP custom recovery on this mobile.
- Now you have to download and open the SDK Platform Tool on your computer and move the Redmi 9 Prime quick recovery file to the SDK Platform Tool.
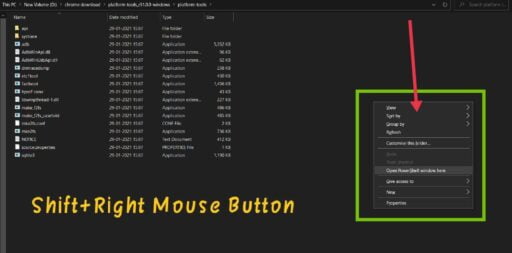
[The moved TWRP recovery file has to be renamed with this (twrp.img) name.] - Now you have to open the command prompt in the SDK Platform Tool.
[One has to press the Shift Key + Right Mouse Button in an empty space in the SDK Platform Tool file. This will open the command prompt on your computer]
OR
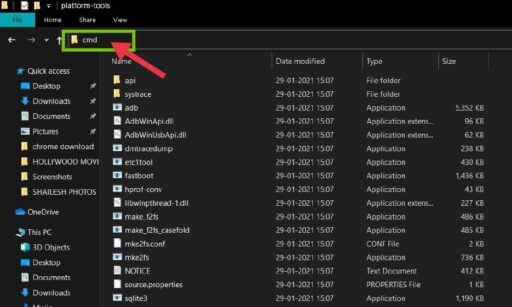
[Or you can open Command Prompt by typing CMD in the address bar of that file.]
- Boot your Redmi 9 Prime phone in Fastboot mode.
[First switch off your phone and press Power button + Volume down button for 8-10 sec after that your phone will boot into Fastboot Mode]
- After booting the phone in Fastboot Mode, you have to type the command on your computer in this way. please type the command properly.
Fastboot devices
Fastboot flash recovery twrp.img
Fastboot boot recovery twrp.img
Fastboot reboot

After typing these commands TWRP recovery will be successfully installed on your phone.
[Install Custom ROM on Redmi 9 Prime]
After TWRP recovery is installed in Redmi 9 Prime you have to boot your phone in TWRP Recovery mode.
[First switch off your phone and press Power button + Volume Up button for 8-10 sec after that your phone will boot into TWRP Recovery Mode]
- After booting into recovery mode, you have to click on Wipe Option, next you will see the option of Advanced wipe, clicking on that Dalvik Cache, Cache, System, Data has to be ticked on all four and slide it to Swipe to Wipe.

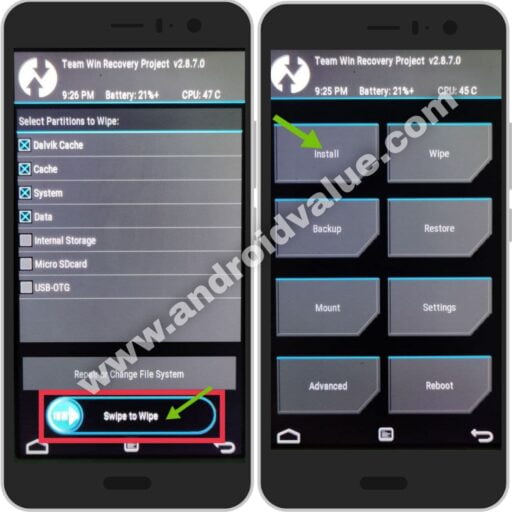
[Wipe Option→Advanced wipe→Select Dalvik Cache, Cache, System, Data→Swipe to Wipe]
- After the data wipe is done, click on the home button. Now from this onwards have to flash the Custom Rom.
- Click on Install, Select your Custom ROM, and Swipe to confirm.

[This process may take around 5-10 minutes. It may take longer if your file is large]

[Install Open Gapps on Redmi 9 Prime]
If your custom ROM doesn’t already have Gapps, you’ll need to flash it separately.
- Click on Install, Select your Gapps, and Swipe to confirm.

[This process may take around 4-8 minutes. It may take longer if your file is large]
Thank you for giving your valuable time to this website.
I told you here how you can flash custom ROM on your Redmi 9 Prime. If you have understood this process, then share this article with your friends. thanks